Build Your Own Simple Casket
Looking for plans and step-by-step instructions to build your own casket?
Follow these instructions if you want to build your own casket. A casket is rectangular and has 6 sides (4 side walls + 1 top + 1 bottom), whereas a coffin has 8 sides (6 side walls + top + bottom).
If you want to build your own coffin like in the Old Western movies, then take a look at our coffin plans. A coffin--also known as a toe-pincher coffin--is also suitable for a Halloween or stage prop.
If you are looking for information on building a casket a little more involved than a "plain pine box" you may want to read, So You Wanna Build a Casket.
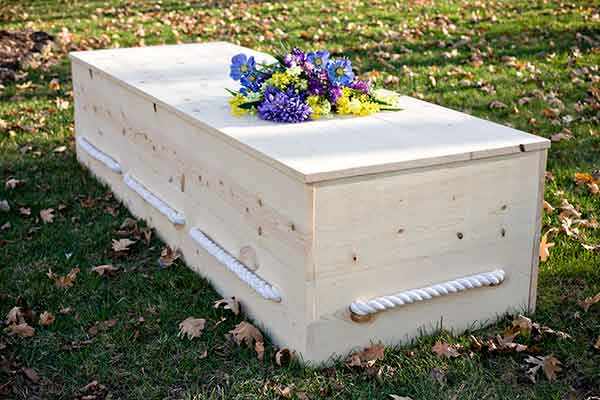
Figure 1 - Follow these instructions to build a plain pine box style casket as pictured here.
Before you start...
Building your own casket can be a rewarding experience. The time you spend yourself or with family members crafting a casket for a loved one can be a memorable and therapeutic experience. I built my first casket for my Grandfather when he passed away just days before Christmas in 2004. I know I made him proud when I designed and built for him a casket that was inexpensive, sturdy, and beautiful in a traditional coffin design that expressed my Grandfather's affection for the Old West.
Before you begin, set your expectations for the time and material cost to build your own casket. These instructions will save you the time to plan and design your casket. If you are an experienced do-it-yourselfer with some basic hand tools, you should plan 6-10 hours to build your first casket--even if you have help. As for materials, you can expect to spend between $150 and $300 depending on the market price for lumber in your area. If you plan to line the inside of your casket with pillows or linens, add this to your cost.
Your finished handmade casket can express any number of finishes that echo the personality of your lost loved one. My Grandfather’s coffin was unfinished pine in the simplest of traditions, but yours can be stained, stenciled, painted, burned, stamped, carved, or filled with bumper stickers and photos to express the life and times of the deceased.
1. Purchase materials and gather a few tools
Below is a bill of materials you can use as a shopping list with estimated prices for 8-foot Select pine boards from your local home improvement store. The total here comes to about $300 + tax. Alternatively, we offer a DIY Casket Kit that includes all wood parts pre-cut to size and ready for assembly. The lumber grade is Select.
- 1in. x 10in. / 10 boards = $234
- 1in. x 8in. / 1 board = $14
- 1in. x 6in. / 1 board = $10
- 1in. x 2in. / 3 furring strips = $3
- Elmer's Wood Glue / 16oz. bottle = $5
- Wood Screws #8 x 1.25 in. / Box of 100 = $8
- White Rope 1.25in. dia / 20ft. = $35
Select your lumber
In spirit with our founding principle to promote sustainable practices for a smarter planet, we recommend saving the finest pine and other fine hardwoods for longer-lasting purposes like book cases, homebuilding, and fine furniture. The lower grades of pine are suitable for Grandpa's casket.
When selecting pine boards for your casket, the more square the material, the easier your assembly will be. Typically, lumber and home improvement stores carry 3 grades of pine: (1) Choice, (2) Select, and (3) Clear. These grades indicate the degree to which the lumber contains knots and knot holes. The higher the grade, the less likely the boards will contain loose knots, knot holes, twist, or warp. The higher the grade, the higher the cost. We recommend the low- or mid-grade, Choice or Select Pine. Try to find uniform boards in the Choice pile. To ease assembly--especially if this is your first casket--you may want to opt for the mid-grade, Select Pine, because the uniformity in the boards will give you less warping or twist in the boards and make your assembly a bit easier. Knot holes will not be a problem and will only add character to your finished casket.
A few notes on selecting lumber
You will notice that your 1x10 boards are actually 0.75 inches thick and only about 9.25 inches wide. The size may vary somewhat depending on the practices at the mill that cut the lumber. The width of your boards may vary from 9 inches to 9.5 inches. As you select the boards at the store, try to get them all in the same uniform width. If you cannot, that is o.k., we can accommodate the small variances as we assemble them. Try to cut the sides and ends from 5 boards that are exactly the same width. Save the non-uniform boards for the floor and top.
Collect the following hand tools
- Hand saw, cross cut (circle) saw, or miter box saw
- Tape measure
- Framing square
- Hammer or rubber mallet
- Screw driver or cordless power driver
- Scraper or chisel
2. Prepare your cut list
Next, cut and prepare the following boards.
- Two (2) Bottom Frame Rails / 1in. x 2in. by 76.5 inches
- Five (5) Bottom Frame Crossbars / 1in. x 2in. by 22.5 inches
- Two (2) Floor boards (outside) / 1in. x 10in. by 76.5 inches
- One (1) Floor board (center) / 1in. x 6in. by 76.5 inches
- Four (4) Side boards / 1in. x 10in. by 78.25 inches
- Four (4) End boards / 1in. x 10in. by 24 inches
- Two (2) Top boards (outside) / 1in. x 10in. by 78.50 inches
- One (1) Top board (center) / 1in. x 8in. by 78.50 inches
3. Assemble the floor frame
The first step is to assemble the frame for the floor. The finished frame dimensions are 24 inches by 76.5 inches. The frame consists of two side rails and 5 cross members. As you assemble, focus on keeping the frame square. Use your preferred wood joinery method to attached one cross member at each end and distribute the three middle cross members evenly at approximately 19, 38, and 57 inches.
Why the framed floor? This particular casket design has a framed floor to which the sides are attached with shear joints. The floor boards rest on top of the frame instead of being attached to the sides and ends with tension joints. This design provides strength and will ensure that the bottom of your casket will not fall out. This casket design has survived several "drop tests" with 300 lbs of sand bags.
4. Attach the floorboards to the floor frame
The inside floor is 24 inches wide and 76.5 inches long. Use two 1x10 boards on the outsides and one 1x6 in the middle. (Remember boards can be irregularly sized, but 9.25 + 5.25 + 9.25 = 23.75). You should have 0.25 inches to spare. Space the floor boards evenly and use glue, screws, or nails to fasten the boards to the frame. As you fasten, use caution to square the frame. The more true your frame is to being square, the easier it will be to attach the sides and ends.
5. Drill holes for the rope handles
Select two end boards (1x10x24) and two side boards (1x10x78.25) that will be the bottom boards around the sides and ends. These are the pieces that will attach directly to the floor frame and transfer the support for the handles to the floor. You will drill holes for three rope handles on each side (6 holes) and one rope handle on each end (2 holes). Select a drill bit the same size as the rope you purchased (1 or 1.25 inches). Mark the boards for all holes to be drilled 3 to 3.5 inches from the top edge of the bottom boards leaving about 6 inches of the board between the handle holes and the bottom edge of the casket.
6. Assemble the sides and ends
Plan the location of the boards with holes drilled for rope handles to be near the bottom.
The sides and ends are each two pieces joined along the long edge (with the grain of the wood). Use your preferred wood joinery method (screws, dowels, etc). It is a good idea to use some wood glue even if you are using screws, nails, or alternative wood joinery system. If you plan to remove the screws, you must use wooden dowel pegs, biscuits, or equivalent to provide a good bond between the two pieces of wood.
Note: Make sure to assemble sides and ends such that the edge nearest to the rope handle holes is on the top. This top side should be the side you join the upper side boards to.
7. Assemble the casket lid
Use similar techniques as you did to assemble the sides to assemble the casket top with two outside boards (1x10x78.5) and one middle board (1x8x78.5). Optionally, use leftover 1x2 material and cut 3 pieces each about 23.75 inches in length. Attach these to the underside of the lid at both ends and one in the middle. These pieces will serve two purposes: (1) provide additional strength to the lid, and (2) help align the lid when positioning it on the casket.
8. Prepare to attach the sides and ends to the floor
You may have noticed that the sides are 0.25 inches longer than the length of the floor frame plus the thickness of the two ends. This is to provide an attractive joint that adequately covers the end grain of both end pieces. The ends and sides should measure 18.5 inches from top to bottom. Due to the inconsistencies in mill work, you may find your sides or ends slightly larger or smaller. Take the largest side and subtract the thickness of the floor (which should be 2.25 inches) to get the inside depth of your casket. This measurement should be approximately 16.25 inches. Mark both sides and both ends at this distance from what will be the top edge of your casket. This procedure will ensure that your casket lid fits tightly on all 4 sides by moving the tolerance to the bottom edge of the casket where it will go unnoticed.
9. Attach the ends and sides to the floor
Take one end and the floor and fit together. Tip the casket up on the side edge of the floor so that you can access the underside of the floor and fasten with your preferred fastening method (see side bar). Fasten the other end in the same manner.
With the casket still laying on its side, place one of the sides onto the top and fasten with your preferred method (see side bar). Next, flip the casket over and attach the remaining side.
10. Thread the rope handles
Rope handles are easy to assemble compared to solid wood handles made from scratch and will look nice, too.
The last step is to thread the 20-feet of rope in a manner that provides 3 large handles on each side, and one large handle on each end. Tie the rope in a knot and start in one of the corners (whichever corner you prefer to be the foot of the casket is best). Pull the rope as tight as you can as you thread each handle. There will be plenty of stretch in the rope to provide your pallbearers a good grip when handling the casket.
You are done! The lid is ready to attach with your preferred fastening method. If the casket needs to be ready for a viewing, we encourage some light sanding so nobody catches a sliver. You can also be creative and paint, stain, or decorate your casket to reflect your loved one's life and memories.
Need more help? Try asking a question in our friendly facebook page community.
Want to save time and build this casket with a kit? No cutting! No waste!
